
We continue in our journey within the universe of the much praised WPML plugin, the WordPress translator. Now that you know what you can expect from this complete tool, we will show you how to handle it, from its installation to its configuration, which you’ll find to be very simple and intuitive. Let’s get to work!
1. Installing the WPML Plug-in
Taking into account that it is a paid plug-in, the first thing you must do is buy it. You can do this on the main page.
From here, the purchase process is not complicated. You must choose the version and enter your country of residence so that the system can apply the corresponding VAT. When you complete the payment process, you can download the core of WPML, among other things.
Once you’ve downloaded, installed and activated the WPML plug-in, it will automatically be added to your sidebar, within the WordPress desktop.

2. Setting up the WPML Plug-in
After installing WPML, which you will see is fairly simple, you must set it up; involving just one more step. If you’re a newcomer, you will see a message asking you how you want to continue.

In our case, you should select “No thanks, I will set it up myself”. Now we can access the set-up, which we hope will be very simple thanks to the plug-in itself and this post. Let’s go!
2.1. Setting up Languages
The first thing you must do, without a doubt, is set-up the languages. Accessing WPML > Languages, when setting it up for the first time, you need to choose the language of the existing content, then add the languages that you want to translate your website in to. When choosing the languages, don’t worry, you can return to this set-up whenever you want and remove or add languages.

2.2. Setting up URLs
The next step to follow is to set-up the URL format of the languages you’re going to add to your new multilingual site. With the WPML plug-in, you have three options:
- Different languages in the directory: https://blog.bigtranslation.com/bg
- A different domain for each language: http://blog.bigtranslation.bg
- Name of the language added as a parameter: https://blog.bigtranslation.com/lang=bg
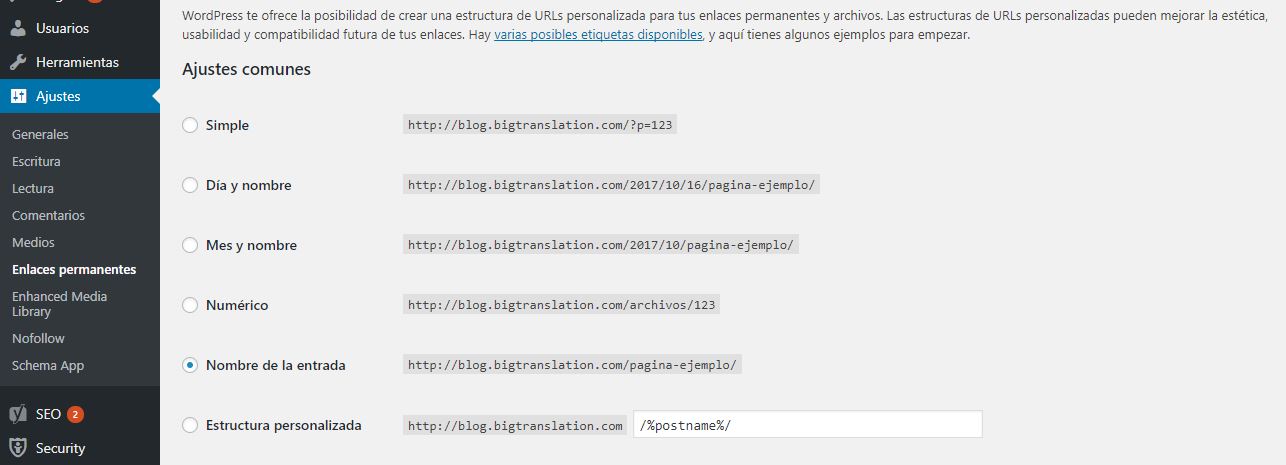
In our case, we choose the first option, although we must specify that, in order for this format type to work correctly, the permanent link structure of the website must be different from the one that comes by default. For this to be the case, you must access Settings > Permanent links and choose any of the remaining options (except the pre-determined option). In our case, we will choose “Name of the post” as it is the most practical and clear.
2.3. Setting up the Language Selector
Next, we are faced with the options to select languages. This is what the user must use to change the language. WPML includes a widget that will add this language selector button to your website, which you can add as a widget or manually.
Setting up the language selector will allow us to modify its position and appearance. Among the infinite possibilities that it gives us, you can choose whether it will be a horizontal menu, drop-down menu or a list, whether it will have flags or the names of the languages, the colours of the widget, etc. You can also go even further by generating a custom selector for your theme.
The most used, and what we recommend, is placing it on the menu and in the footer so that it’s always visible, with the country’s flag and its corresponding language.
2.4. Other WPML Settings
In the same section (WPML > Languages), we can set up other aspects of this plug-in:
- Administration language: the language in which the WordPress backend will be displayed.
- Blog posts to display: in the event that you have posts that are not translated into a certain language, this option allows us to choose whether to display them in the original language or not.

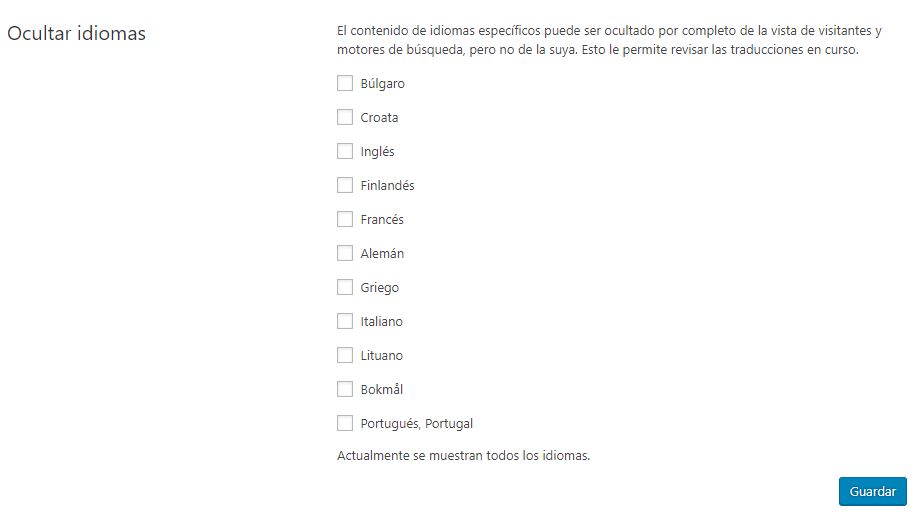
- Hide languages: this is a very practical tool when designing or modifying our website. By checking the boxes of the languages, you will completely hide the content from users and search engines, but you can continue working on them.
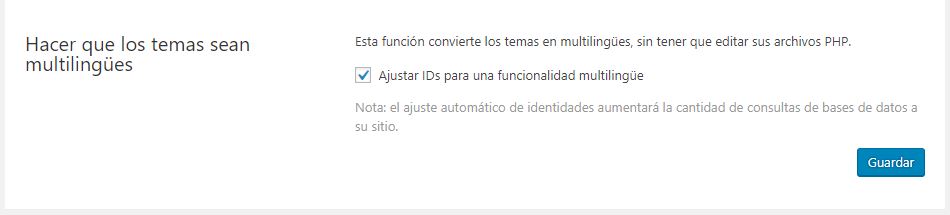
- Make themes multilingual: This function will make your theme multilingual, with needing to modify the PHP files. This is necessary, given that each language has an ID number and the Theme needs to choose it. In the WPML plug-in, these ID numbers, whether pages, tags or categories, vary each time the language changes. Therefore, the Theme needs to use the ID number associated with the active language.
- Redirection according to browser language: this setting has the function to automatically redirect users to the language of their browser, provided that your website has been translated into that language.

- SEO options: don’t overlook this setting, it’s a very important step if you want to obtain the best possible position in the search engines in the different languages of your website. In this section, we talk directly to Google through hreflang tags, indicating which language the translation is in. Fortunately, WPML automatically creates hreflang tags, so the only thing you have to do in “SEO Options” is decide whether you want these tags to appear in the header and order the plug-in to position them as soon as possible (although WPML will do it by default as it is always recommended, except in certain special circumstances that you can see here).

Keep learning about how to use WPML!
If this is all new to you, you won’t want to miss what we’ve got on offer: