
After installing and configuring the WordPress WPML plugin, you’ll be ready to start translating the contents of your website. Let’s get to work!
Although there are many ways to locate and translate content in WordPress, the best way is without a doubt to be the owner or to have access as administrator. At BigTranslation we focus on two cases: you are a translator and you want to translate your own website or you are the translator of a website to which you have access as an administrator.
Translating the title and short description of the website
Before starting, we must emphasise that, in order to be able to access the translation of these two elements, you must purchase the full version of WPML, as it is necessary to have the WPML String Translations add-on installed. This add-on allows you to translate everything that is not a post, taxonomy or a page.
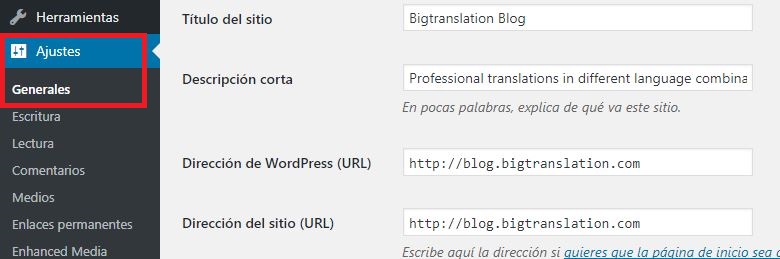
Now, let’s begin. For search engines, both the title of a website and its short description are vital, because they offer the most relevant information with regard to the theme of your website. There is no doubt that their translation is essential.
You can find this much-needed information about your WordPress website in the “Settings > General” menu.
To translate all these elements, you must access WPML > String translation. Once there, in the “Select chains within the domain” drop-down menu, select the “WP” context (the number of strings is indicated in brackets) and click the search button. Now you only have to click the “translations” link and start translating in each of the boxes enabled by languages.
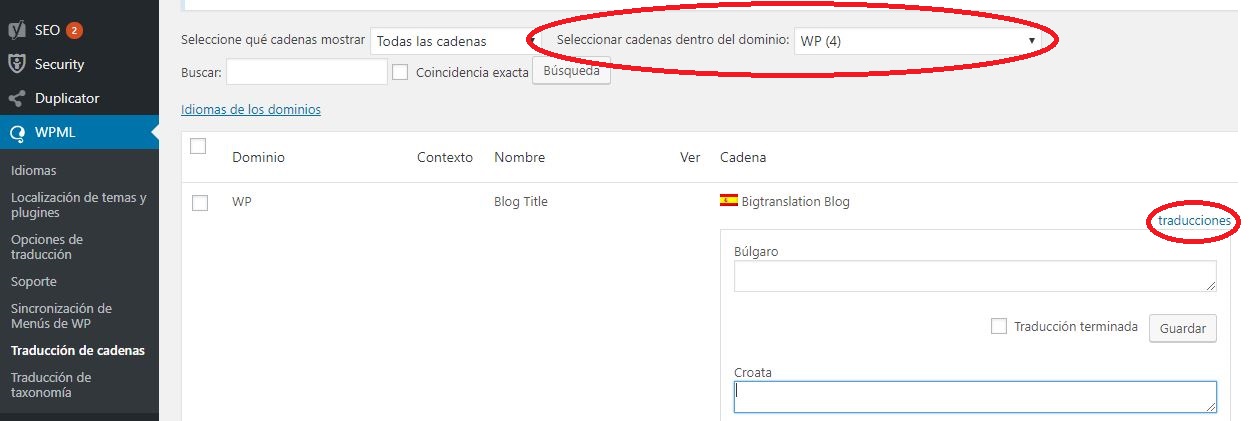
However, string translation is not used only for these elements; in another section, we will see how to translate widgets and other chains simply by choosing another context from the drop-down menu.
Translating pages and their elements
Once the “name and surname(s)” of your website has been translated, it’s time to start with the pages. If you have any doubts, the pages on WordPress are those that incorporate all static content, including the typical “The Company”, “Contact us”, “What do we offer?” and, of course, the main page, also known as Home.
Going into the subject, in order to translate these elements you have to go to the Pages menu on WordPress and click on the + sign situated next to each of them. Once done, a blank page will appear to translate the page you have selected.
Next, in order to be able to link, albeit independently, the page in the original language and the page in the translated language, you will need to click on “Copy content from Spanish”.
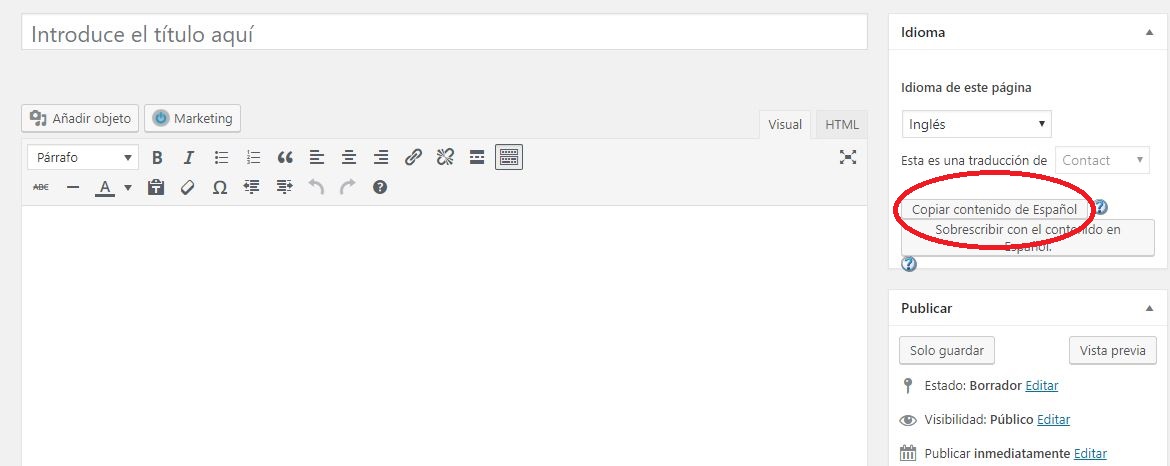
There is another option; click on “Overwrite with the content in Spanish”, although we do not recommend it in this WPML guide due to the fact that, in the future, every change to the original page will cause a chain effect on the translated pages.
Without a doubt, the first elements you should translate are the title of the page and the URL. In the case of the title, we would be talking about a short title like those we have mentioned above: “The Company”, “What do we offer?”, etc., and in the case of the URL (slug, specifically), we would translate the final part of the URL, such as https://www.bigtranslation.com/es/interpretation, and its Spanish translation https://www.bigtranslation.com/fr/interpretacion
It should be noted that WordPress itself normally automatically creates the slug with the page title, but you may want to give it a different name, so you must click on “Edit” and change it.

The translation of the content can be done directly in the text box, although you will have to take into account several elements:
- Although we traditionally recommend translating in the “Text” part (written in html), if you take a bit of care and know the WordPress text formats, it is much simpler and quicker to translate in the “Visual” part. Our advice is to have the original page open whilst you are changing the translated page. Should you have any doubts, you can always consult the tags in the “Text” part.
- You must take into account the shortcodes (an example could be a button). The shortcodes, similar to html tags, also normally need to be translated, so in the “Text” part you will locate the part to translate in square brackets ([ ]), instead of recurring brackets < >. Our recommendation, so that you know exactly what to translate, is to keep the website open alongside it, as it has highly valuable visual information. As an example, a button shortcode would be [Button text=”Más info”], whose English translation would be [Button text=”More info”].
- We also cannot forget the links. If the content of your page contains links to other pages and/or posts, you must change the URL to that of the language into which you are translating.
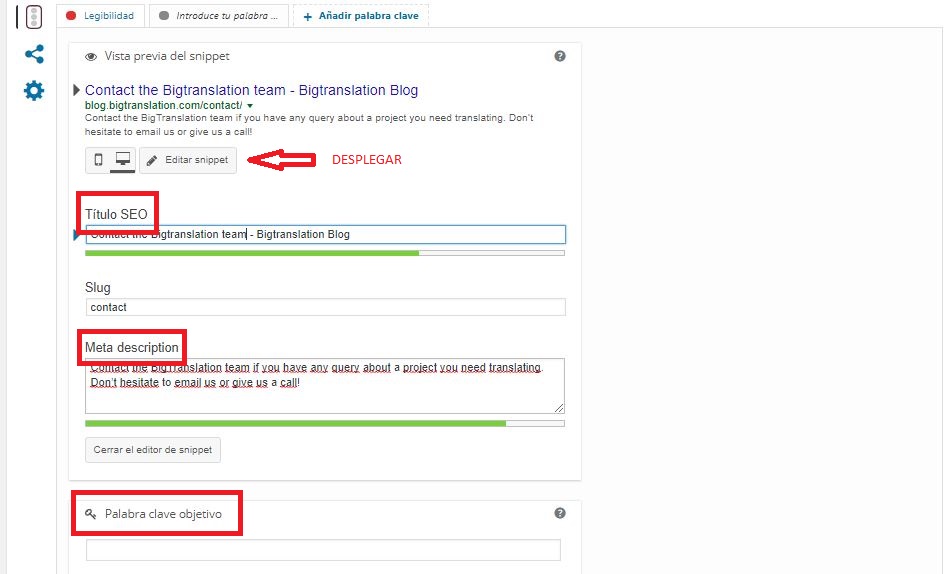
Once you have translated the content, we will show you how to proceed with one of the most important parts: SEO options. When translating these sections, it doesn’t matter what SEO plug-in you use, as you will have to translate these meta-tags:
- Title of the document; the most important SEO tag. This text is what will be seen at the top of the browser on each of the pages, although it will also be the title that will appear in the search results, such as those of Google.
- Description of the page. As indicated in its name, this is the text that briefly describes the pages. Search engines normally place this under the URL in the search results.
- Keywords. Keywords are a list of terms describing the page’s theme. They used to be demanded by search engines, but now they are not, although it must be taken into account that some search engines (for example, Yandex) do continue to consider them and their misuse could affect positioning.
Next, we will show you a screenshot so that you can check the boxes that will appear with the SEO options. In our case, we will use the SEO WordPress plug-in by Yoast.
Keep learning about how to use WPML!
If this is all new to you, you won’t want to miss what we’ve got on offer: